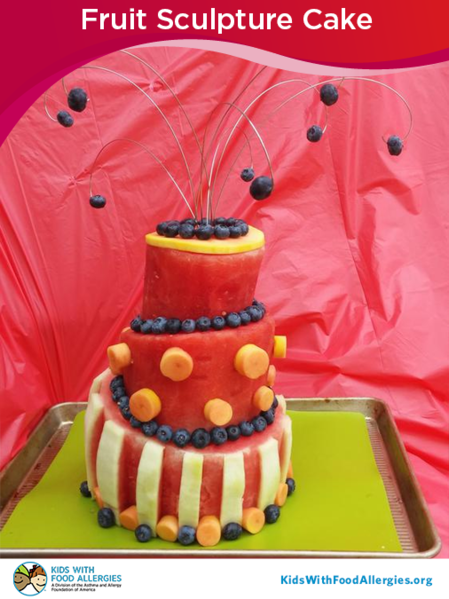
Need a new idea for summer parties when you want something festive, cool and refreshing? Try this top-8 free, vegan and healthy fruit sculpture "cake."
Some guests may be allergic to certain fruits or have Oral Allergy Syndrome. This method can be easily adapted to any fruits you like that are safe for your family and guests.
Fruits:
- 2 seedless watermelons
- 1 papaya
- 1 pint of blueberries
Equipment:
- cutting boards
- paring knife
- long slim knife
- vegetable peeler
- 2 sizes of small circle cutters
- toothpicks
- wooden skewers
- cake wire hooks
- coffee stirrers
Bottom Layer:
Start by cutting the end off of the first watermelon with a long knife. This gives you a more stable piece to work with. Set this flat on the board.
The bottom layer is about 1/2 of a watermelon. To get the topsy-tuvy effect, cut across the watermelon at an angle. This is the bottom "layer" of the cake.
Peel the skin off with the vegetable peeler to expose the white rind. Using the natural lines in the rind, cut every other rind section out with the paring knife. This will make stripes.
Middle Layer:
Cut the middle layer from the rest of the watermelon. Make it about 1-2 inches smaller in diameter than the bottom layer. The bottom cut is already angled. Angle the top cut in the opposite direction. It will look a bit like a wedge.
Place the middle layer on the bottom layer. Adjust the angle to make the topsy-turvy look. The tall part of the middle layer should be over the shorter part of the bottom layer. Secure it to the bottom layer with 4 wooden skewers.
Top Layer:
Cut the top layer from the second watermelon. It should be about 1-2 inches smaller in diameter than the middle layer. Cut the bottom on an angle to match the middle layer. The top should be flat when placed on the stack.
Line up the angles and lower this piece onto the skewers. Cut skewers if needed.
Decoration:
Cut about 4" off the large end of the papaya. Remove the seeds. Cut a thin slice and place on the top layer.
Cut remaining fruit lengthwise and remove seeds. Cut again into long strips. Use 2 sizes of small circle cutters to cut pieces from the papaya. Place circles on the middle layer and along the rind of the bottom layer. Secure all with toothpicks.
Place blueberries on cake edges with toothpicks.
For the top spray, place blueberries on wire hooks. Most wire is not food safe and can't be inserted directly into the cake layer. Cut lengths of coffee stirrers and place over the end of the wire. Insert the coffee stirrer into the top of the cake. Carefully remove all wires before cutting the cake. Do not eat the blueberries from the ends of the wires.
Enjoy!
Thank you to Kandi Williams for her assistance on creating this cake. Kandi is a volunteer Community Host for the Kids With Food Allergies online community support forums.


Comments (1)