This is the second part of a multi-step instructional series written by Kathy Przywara, our recipe coordinator and a leader of our Food & Cooking support team. Be sure to read the first step, which provides tips on how to remove your cake from the pan and cool the cake.
Level and Torte Your Cake
OK, you have a baked cake! What do you do with it now? The first step is to level your cake if you have not already done that before you turned it out of the pan. If you have, then you can skip this step. Leveling means to cut the dome off the top so that you have a flat surface. This is one of the keys to making a professional-looking cake - start with a flat canvas. If your decorating involves just slathering it with frosting and making it look swirly and fluffy, you can skip the leveling step.
You can buy an inexpensive cake leveler, but I've found that the wire one does not work very well with denser, allergen-friendly cakes. I use a long rather stiff serrated bread knife. I've seen recommendations for using a new thin saw blade. Always wash the saw blade first to remove any manufacturing residue.
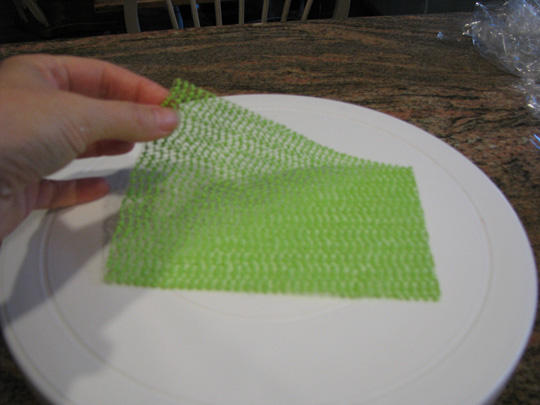
The hardest part of leveling is to...well, make sure it's level! Put your cake on something flat. I use a cake board which is a piece of cardboard the same size as your cake. Place this on your turntable if you have one. You can get cake boards at the craft or cake supply store. Make sure the cake is reasonably centered. Your cake is not glued to your cake board yet, so just be gentle with it so it doesn't slide. You will need something to make sure your cake board won't slide around on your turntable though. I've found the best thing for this is the rubber "grippy" shelf liner. You can buy it in rolls at the hardware or kitchen store. It works great for all sorts of things!
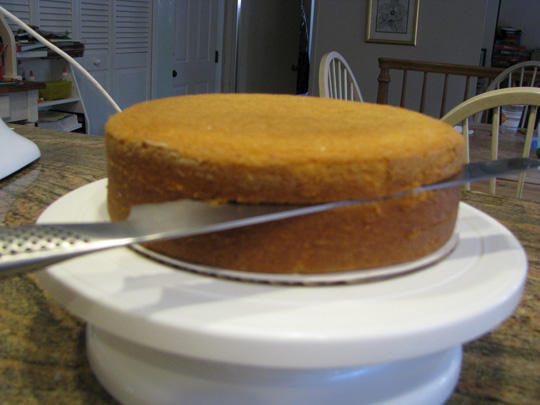
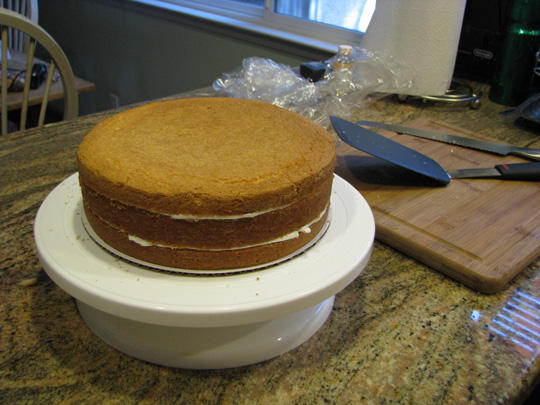
Hold your knife level and use a sawing motion to slice off the dome. You only need to remove the domed part. It's okay to have a small rounded shoulder on your cake. Don't cut so low that you go into the straight side. You can fill the small gap with frosting. You want to keep as much of the height of the cake as possible. The cake I show here did not need to be leveled - the top is flat enough that it was not necessary. You can see that it does have a rounded shoulder, but that will be just fine.
If you've baked your cake as two thin layers, you will likely need to level both layers. If you've baked your cake in a 2" or 3" pan, level the top, then "torte" the cake into two or three layers.
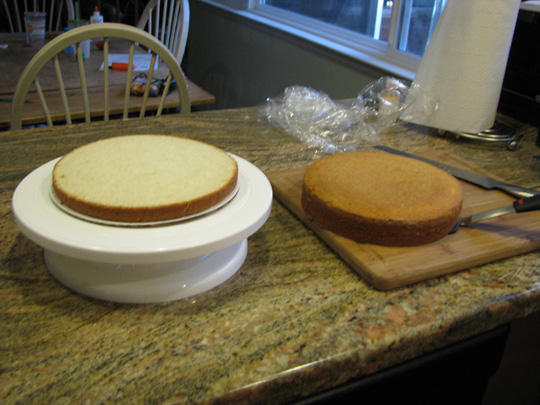
Torting is simply slicing the cake into more layers. It's done exactly the same as for leveling, but you keep the pieces instead of nibbling on them as scraps. If you want three layers, it is easier if your cake is on the dense side (think pound type cake). If I want a nice tall cake, I will bake 2 - 3" cakes and torte each one into two layers. I then stack these for four layers total!
On a round cake, I hold the knife level at the side, go around and just score the outside to make sure I meet back up where I started. Round cakes are easiest to work with on a turntable. If you don't have one, that's okay. You can use any kind of lazy Susan for this too. If you are making multiple layers, make all your score lines first. Once you have the score line, start slicing through the cake farther and farther while still turning. Always use a sawing motion with your knife. Just work your way in an inch or so more with every revolution. Don't rush it as that is more likely to split your cake. Eventually, you will get to where the knife will slide though the entire layer and out the other side. Leave this layer in place while you cut the other.
On a square cake, I score two opposite sides to the same height, and then guide my knife from a different side between the markings. In other words, the tip of my knife is along one score line and the heel of my knife is along the other. I actually use my wire leveler to set the heights, but use a knife to actually score and cut. You can use matching pieces of wood or other material on each side to keep your knife level also.
Fill and Assemble Your Cake
Now we need to glue all the layers together. Choose your filling....the filling between the layers can be just about anything. It can be buttercream frosting, pudding, preserves, lemon curd, whipped cream and strawberries, buttercream with crushed cookies, etc. If there are chunks in your filling, such as cookies or fruit, the chunks should be small so they don't cause problems when cutting the cake.
There are some considerations on what you use for your filling. How many layers? If you have more layers, a soft filling like pudding or whipped cream will be more likely to slide and cause problems like bulging. Will your cake be refrigerated or sit out for display? If your cake will be sitting out, be sure to pick a non-perishable filling. Jams and preserves are fine at room temperature. Buttercream can sit out for a couple of days even if it has real butter and milk or soy milk in it. The sugar content is so high that it acts as a preservative. Something like pudding, whipped cream or fresh fruit will need to be refrigerated and don’t keep it out longer than a day.
I generally start with the top of the cake face down on the cake board and build it upside down as I go. That gives me the bottom of my baked cake as a nice flat, uncut and mostly crumb free surface for the top of my cake. This will make your final frosting much easier and neater. Put a dab of frosting on the cake board to secure the cake layer so it won't slide around. Place the board on top of your leveled/torted cake and flip the whole thing over. In order to reduce the chances of breakage, always flip your cake back and forth rather than trying to scoot it around. This cake board will be the support for your cake when you move it. You will not see this board. Now, move the top layer(s) and set them to the side. Use another cake board (cover in foil or plastic wrap so it can be reused) or a wide, flat spatula to facilitate moving your layers. Picking them up by hand may result in cracking. You want them supported as you move them.
You will also need something as a presentation base for your cake. This is usually a cardboard cut 2" larger than your cake that is covered in foil. You can use a flat cake plate or stand or even cover the bottom of a baking sheet in foil, but a regular dinner plate is not recommended because they are usually not flat from center to edge and will have an upcurve at the edge. That will make things much more difficult when trying to frost and decorate the sides. Your flat cake board will not sit right on a curved plate.
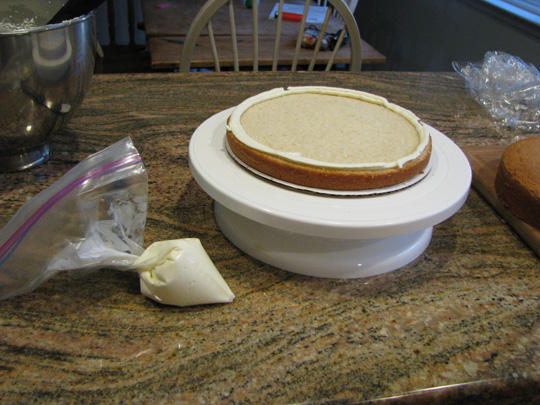
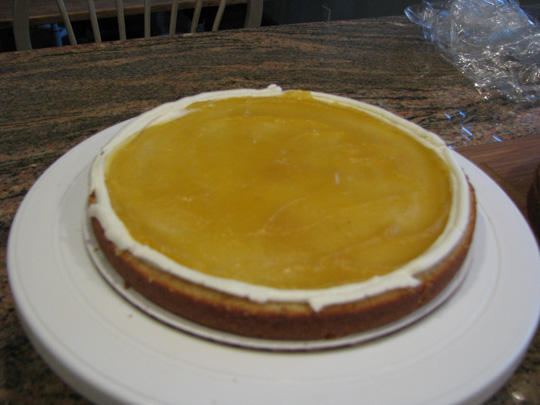
If you are using something other than frosting as your filling, you will still need a small amount of frosting to create a dam so that your filling does not ooze off the edges. Fill a pastry bag or even a Ziploc bag with some frosting. If using a piping bag and tip, use a #3 or #4 round tip. If using a Ziploc, just cut a small snip off the corner. Make sure the snipped off corner makes it into the trash – don’t leave it on your counter as it may find its way into your frosting. Don’t ask me how I know this! Be sure to use a heavy Ziploc bag and not a thin sandwich type one. The thin ones tend to burst when you squeeze them too hard. Again, don’t ask me how I know! The color of this frosting is not really important as it won't be seen until the cake is cut. Pipe a ring around the edge of the cake. This is your dam. Fill the center with your filling and spread it out to the dam. If you are filling with frosting, you can use the bag to squidge lines of frosting and then just smooth it out with your spatula. Do not put too thick of an amount of filling between your layers. It should just be tasty glue.
Put your next layer on top and make sure it's centered. Press down all over to make sure you have good adhesion and even distribution of your filling. If your layers are not quite even (I know mine NEVER are!), make sure you try to keep them in the same order and orientation as you stack them back up. You can even cut a registration mark vertically on the side before you start torting to make this easier.
Repeat this process for each layer - pipe a dam of frosting, spread in filling, put next layer on top - until you have the top layer on. Now, big sigh of relief! You've made it through the first part!
Next in this series, we will learn how to apply a crumb coat and frost a cake!
Kathy Przywara is the mother of two children with food allergies and started as a volunteer for Kids With Food Allergies Foundation (KFA), a division of the Asthma and Allergy Foundation of America (AAFA), since it opened as a nonprofit. She is the Sr Community Director for the Asthma and Allergy Foundation of America. Her recipe for Wacky Cake remains one of KFA's most popular recipes.



Comments (0)